|
I am on Varian 600
Preparation of the spectrometer
Tuning
Locking
Gradient Shimming
Making a new experiment in the workspace
Proton and carbon 1D
2D experiments and other exciting stuff
Saving my data
Finishing my work
Importing and processing NMR data to Topspin
Restarting VT/Gas control
Solvent reference data
Specialized procedures (require separate training!)
Using variable temperature
Restarting spectrometer (only by authorized users!)
Turning on the spectrometer after a power outage (only by authorized users!)
Restoring cable contact for carbon tuning (only by authorized users!)
Back to Top
Preparation of the spectrometer
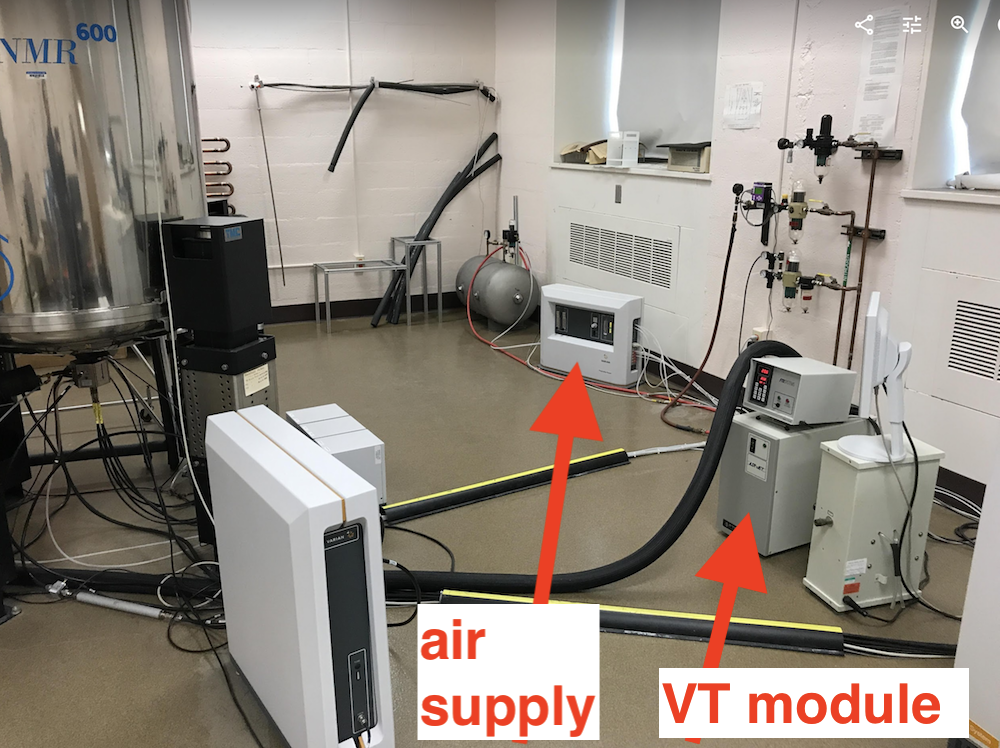
1. Verify functional state of the Air supply and VT module
As you walk into the room: check that variable temperature and air supply modules are functional. Your standard operation temperature will be 25 Deg C. For using other temperatures see Using variable temperature section.
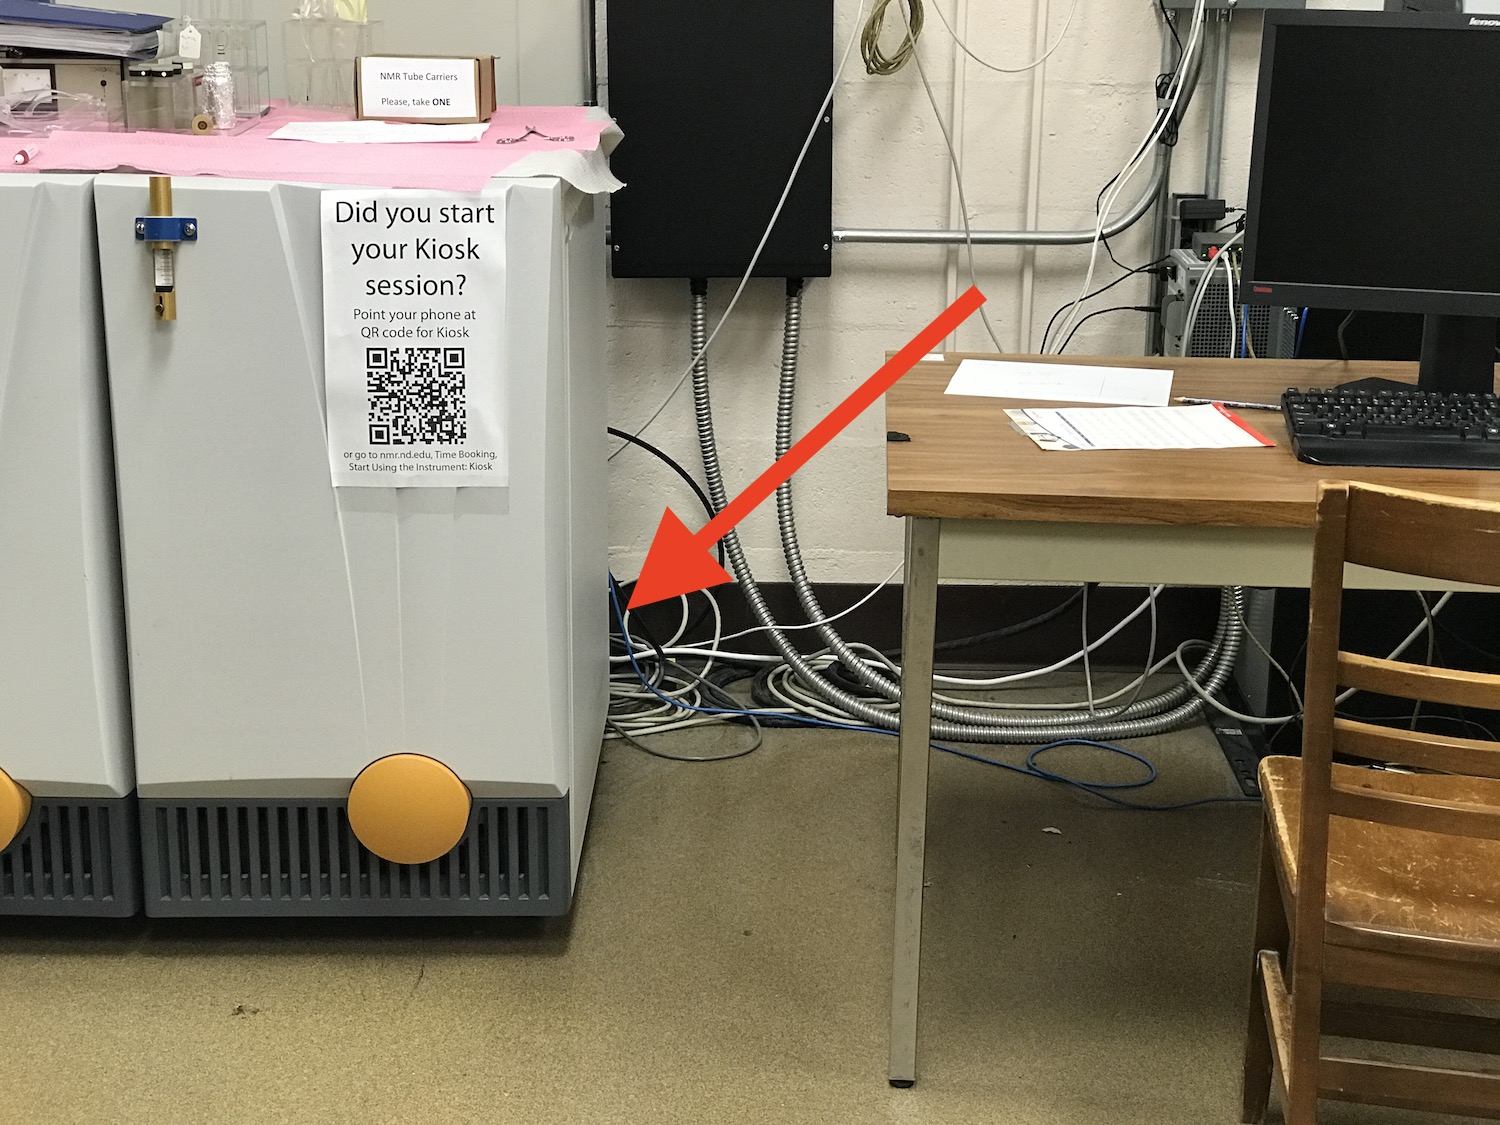
- Find Air supply and VT module in the room:
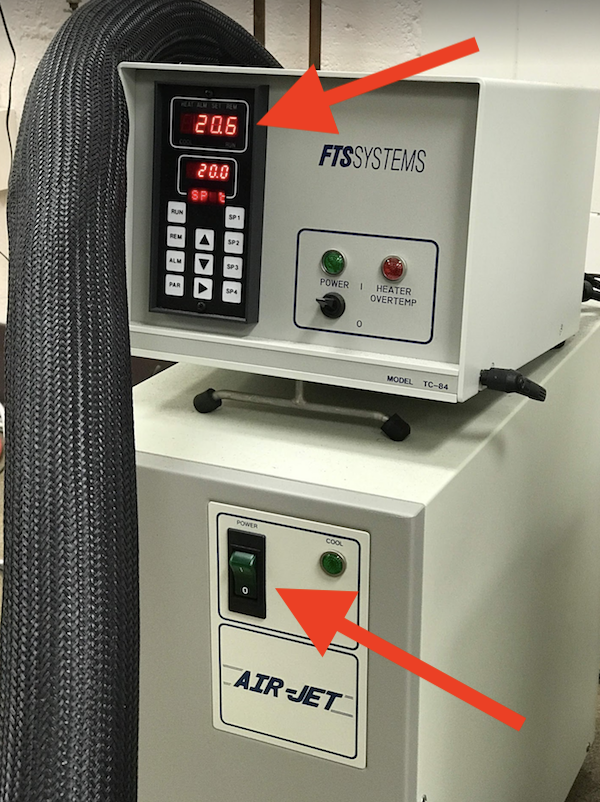
- The VT module contains the FTS Systems control box sitting on top of the AirJet.
- First, check that the AirJet is OFF. If - not, then press the green switch to turn it off.
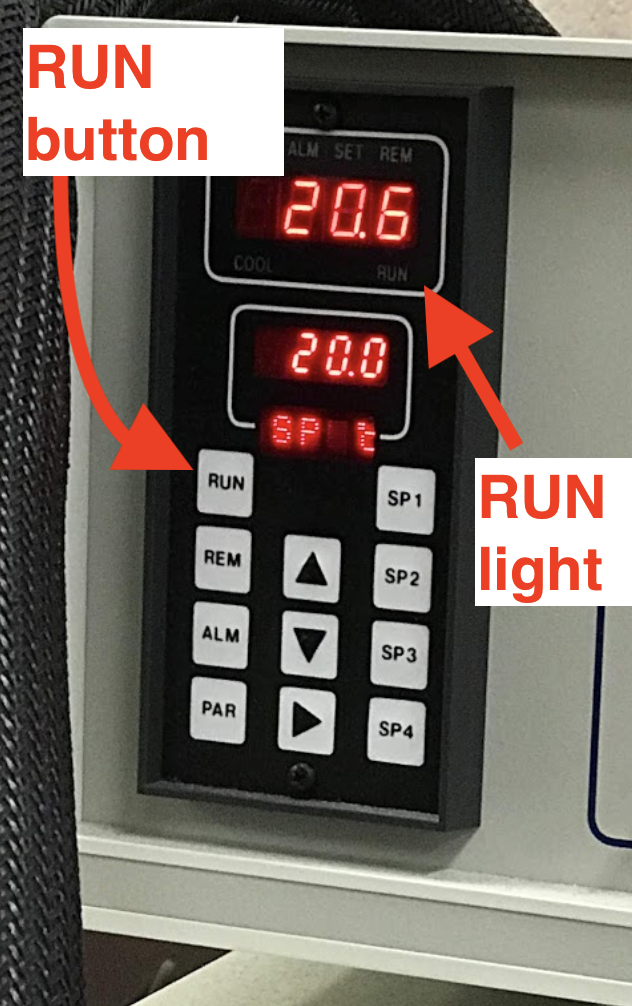
- The FTS module on top has a display. If green "RUN" is lit, press white "RUN" button once to turn it off:
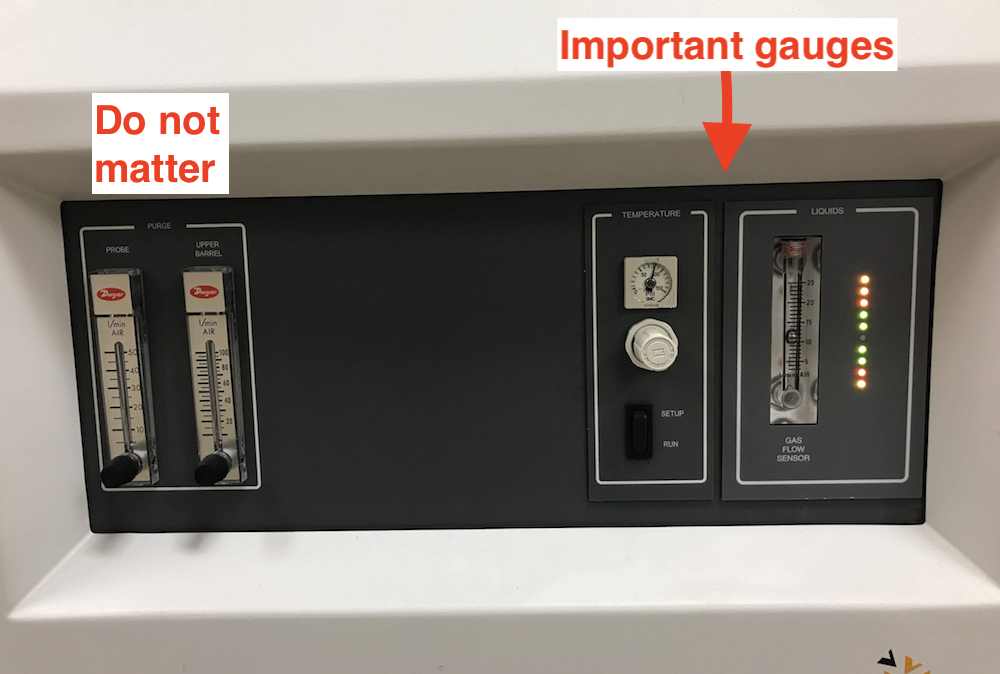
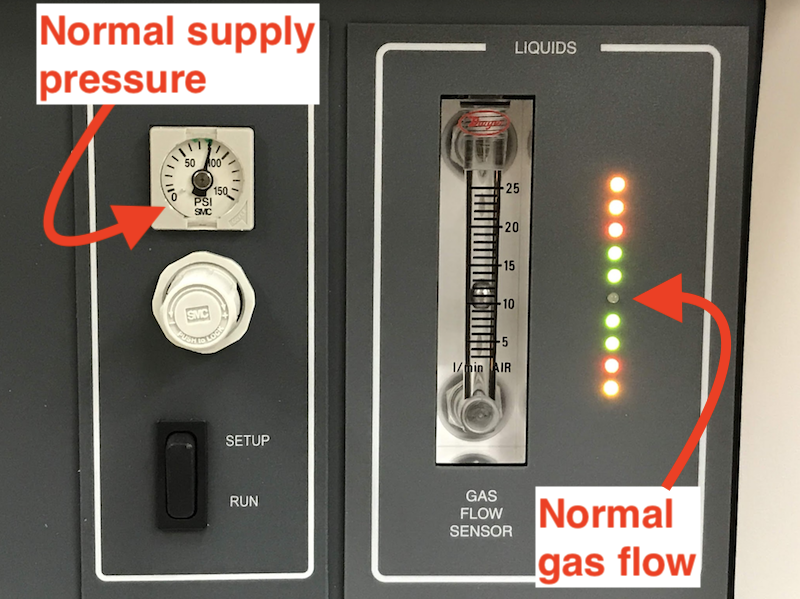
- Check air flow value in the Air supply unit (this is actually N2 not air):
NOTE: If you don't see normal gas flow value of about 12 L/min, you need to restart VT and air supply system. See: Restarting VT/Gas control
At this point, the VT module and Air supply (Pneumatics) are in a correct state.
2. Start temperature control through VNMRJ
- Log into workstation
- start VNMRJ software
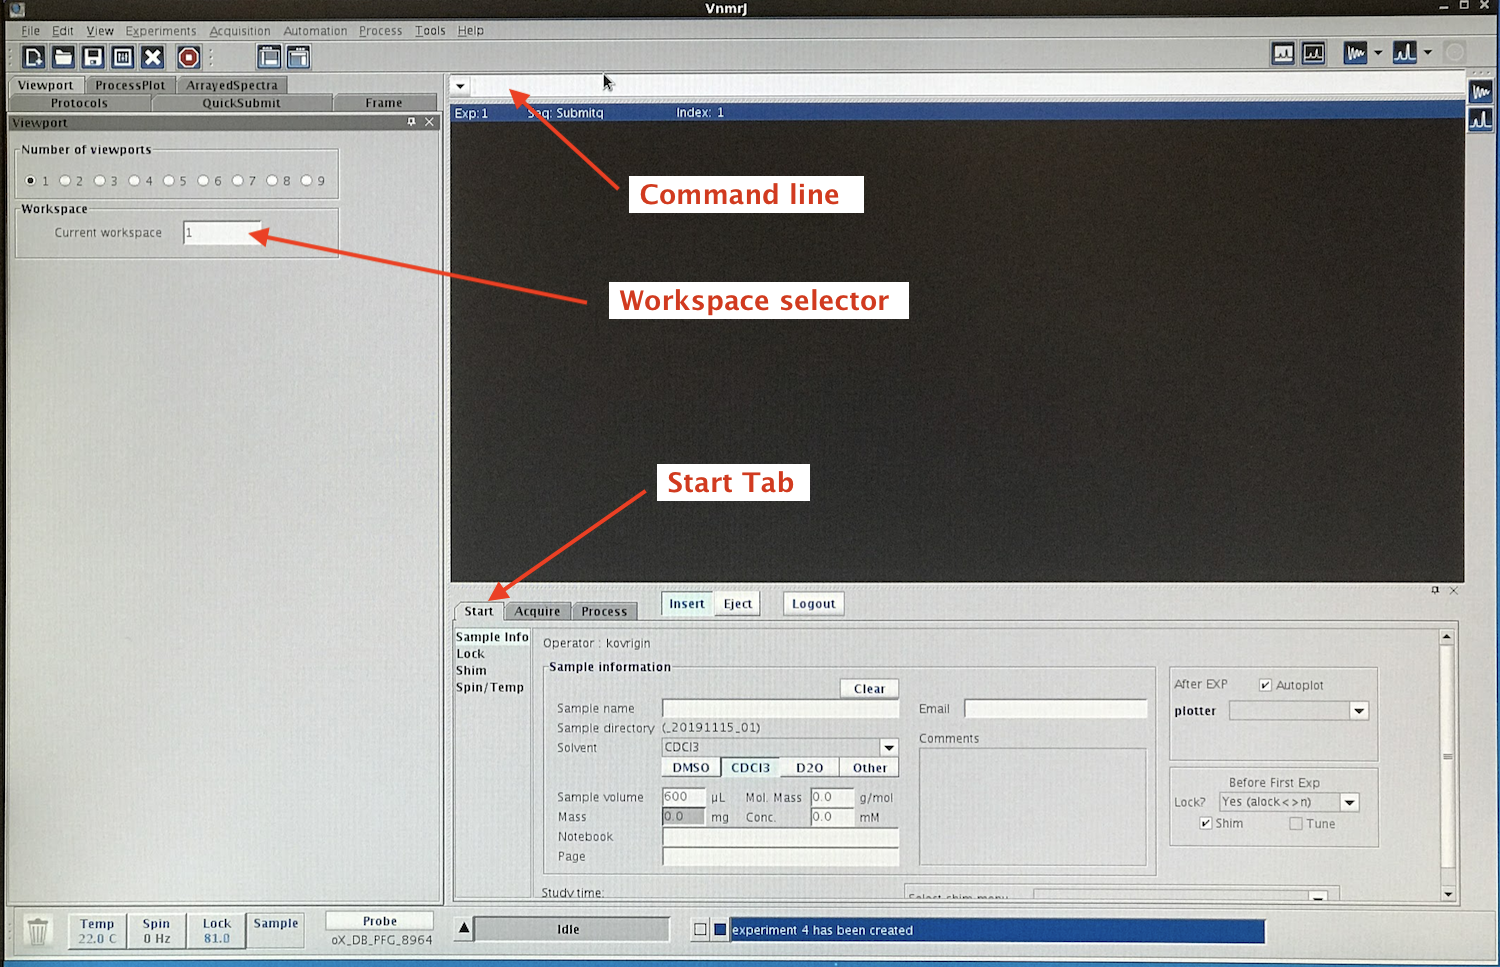
- Type on a command line: vttype=0
NOTE: You should do this every time after restarting VNMRJ!
- Set temperature to 25C
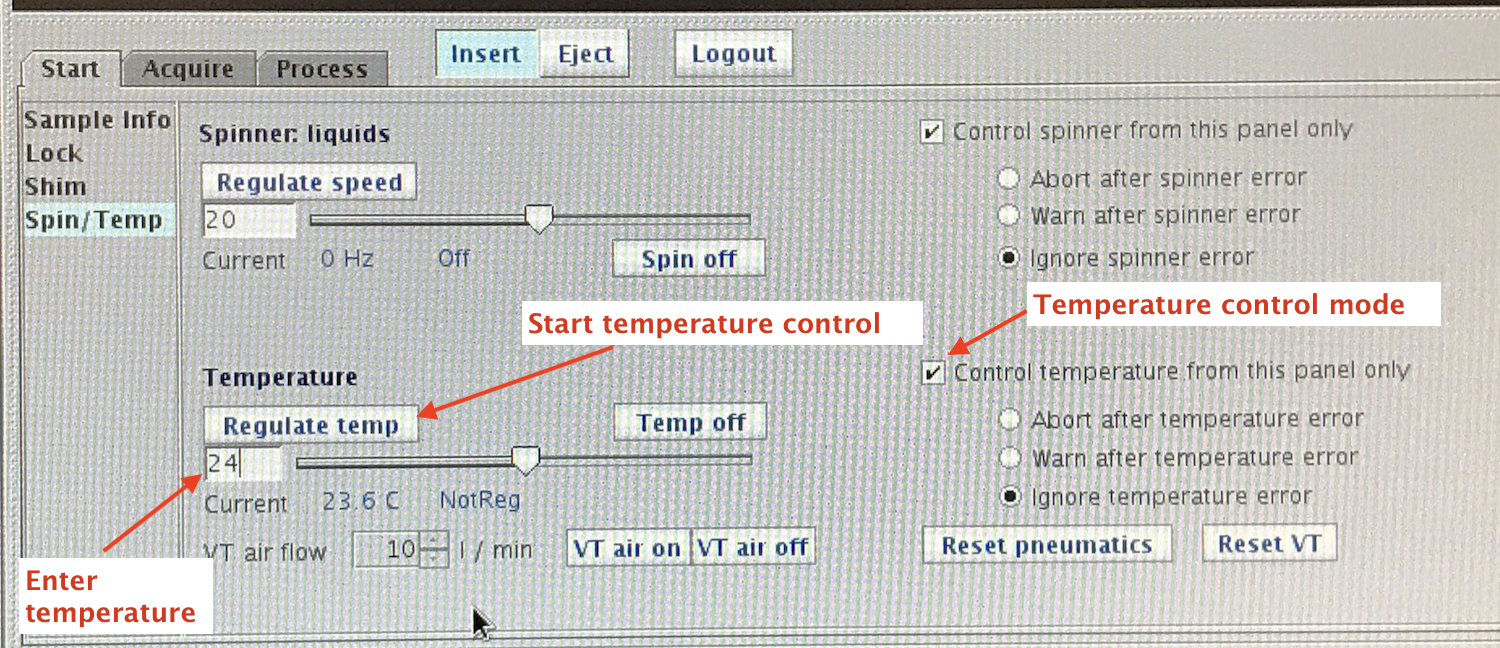
- Open Start tab:Spin/Temp section
- Check the checkboxes
- Control spinner fromn this panel only and
- Control temperature from this panel only
- Enter 24 in the Temperature subsection
- Hit Enter key on keyboard
- click Regulate Temp button on screen.
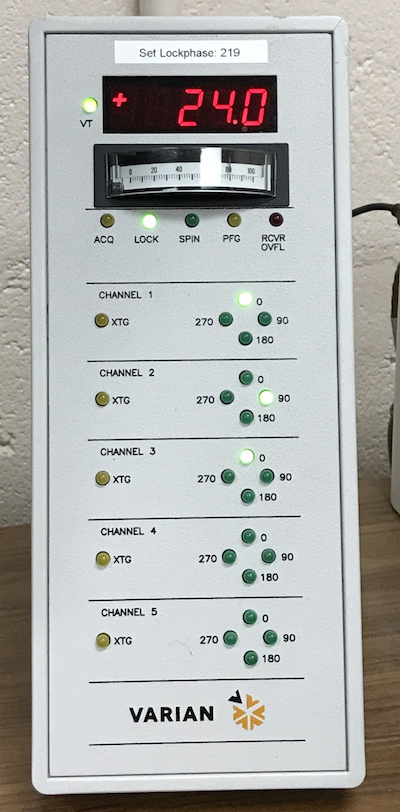
In 3-5 min you should see it stabilized on the VT display:
NOTE: If temperature was very different before you came (10-20 degrees away from 24), you will need to wait 5-10 minutes to allow for thermal equilibriation of the probe and the sample.
NOTE: Spinning on this machine is not stable and not recommended.
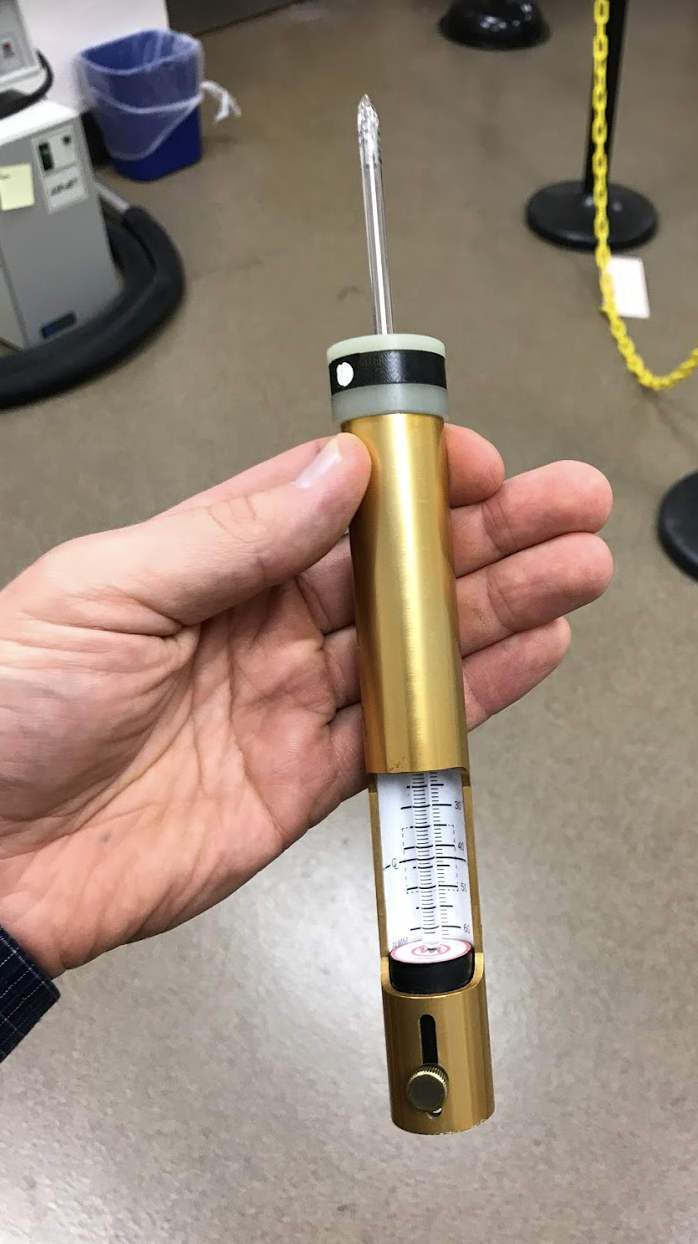
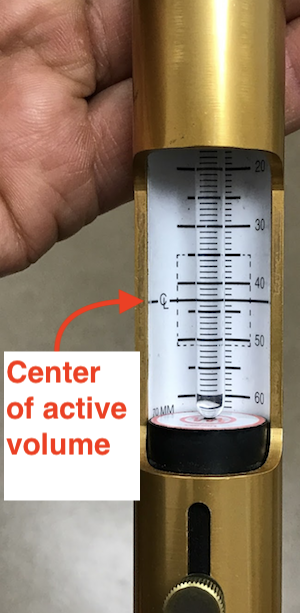
3. Insert sample in the spinner
Optimal sample volume for the 5-mm tube is 550 uL. For deuterated organic solvents and D2O, you may safely put more.
Adjust the tube in the spinner so that it touches the bottom piece of the depth gauge
The dashed area shows where the coils are. This is the "active volume" from where signal is detected. If your sample is smaller than 550 uL, you need to make sure top and bottom of the solution are at equal distance from the center line of the active volume.
4. Insert sample in the magnet
- Unlock the instrument:
- Click on Start tab, Lock section
- Uncheck Lock checkbox
- Turn off spinning
- Click on Spin/Temp section
- Click Spin off
- Click Eject button
- Replace standard sample with your sample at the top of the bore
- Click Insert button
Your sample and spectrometer are ready for tuning, locking, and shimming.
Back to Top
TuningTuning may be done in any workspace. I recommend assigning the workspace #1 just for tuning
- issue trtune('remotely') on a command line. If re-using workspace 2 - no need for this command as trtune interface is already set in the workspace.
- Navigate to Acquire tab
- Select
- 1st Center Frequency: H1,
- 2nd Center Frequency: C13
- # Traces : 2
- Click Start
- Change Span if necessary
- Change spectrum magnification: Autoscale, then click Vertical Display button
- Hint: To maximize the screen view to see it from the probe: click on [x] in the right-hand side of the Parameter panel. To bring it back you go to top menu bar View: Parameter Panel
- Go to the probe tune boxes. If you need to tune both proton and X nucleus, start with Broadband Channel
Broadband channel
High-frequency channel: 1H or 19F
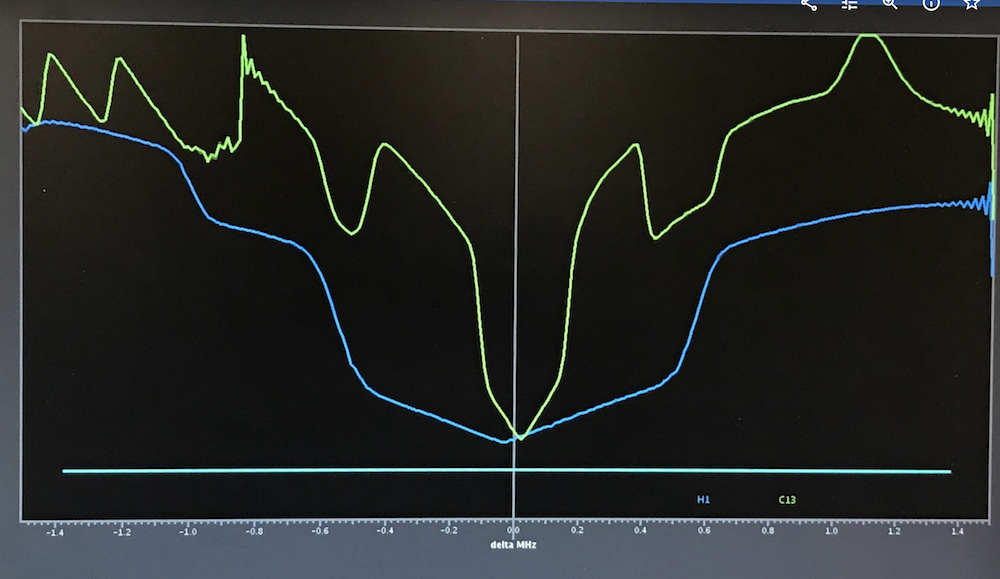
Here is a view of a tuned probe with 3 MHz Span
NOTE: If the carbon profile is not looking symmetrical (above), this means the cable contact in the console is not good. Follow these steps to try to restore contact: Restoring cable contact for carbon tuning
Finishing Tuning
- Click Stop to stop tunning.
- Proceed with locking.
Locking
- Verify that your sample contains at least 10% of the deuterated solvent
- load the standard shimset:
- issue rts
- enter a name of a good shimset that you have saved before (if you don't have it - ignore this step)
- issue su
- Join the first workspace
- Viewport tab
- Workspace section
- Type 2 in the Current Workspace window and hit Enter
- Click on Start tab, Sample Info section
- Set Solvent to your solvent either clicking a button or selecting from the drop-down list.
- Click on Lock section
- Click Select Lock signal button,
- Choose Measure 2H spectrum
- on a spectrum, zoom in around the 2H line (left and right mouse buttons and click a toolbar on the right: Zoom In)
NOTE: This step helps you verify if you have lock solvent in your tube. No spectrum - no lock solvent!
- click on the 2H line
- Click Move cursor to the nearest line
- Click Adjust z0 NOW!
- Read value of Lock Level.
- If it is >20, you are good to continue with Tuning and Shimming.
- If it is <=20, you need to try to adjust lock manually
Manual lock adjustment
- Turn off lock regulation: Uncheck Lock checkbox. You should see Lock Status go to Off
- Click Lock Scan button
- Set
- lock Power level to 40 (hit Enter)
- lock Gain to 40 (hit Enter)
- Adjust Phase to put all signal into red trace (blue goes flat)
- Adjust Z0. Goal: the step-like FID without curvature - the higher the better
- Check if lock level is not saturated:
- note the Lock level value (for example, 62)
- change Power level down by 6 dB (for example, from 40 to 34), hit Enter
- read new Lock level (for example, 32).
- If it is
- increased it certainly was saturated! Reduce Power level by another 6dB
- approximately 1/2 of the initial Lo ck level value (for example, 62 went to 32), the lock is not saturated: you can set the Lock Power back and continue;
- greater than 1/2 (for example, 62 went to 45), lock is saturated and will not be stable. You should set Power level to smaller than the original value by 3 dB and repeat this test.
- Finally, turn on lock regulation:
- Check Lock checkbox.
- Note
- Lock Status changed to Regulated
- Record your lock level in your notebook
- Unclick Lock Scan
- Proceed with shimming of your sample
Gradient Shimming
You must shim every new sample and also re-shim if you changed temperature or did a very long acquisition (>3 hours).
NOTE 2: You must have a good lock level (>20) to for success of gradient shimming! If your lock level is very low, verify that you
- have lock solvent in your sample
- loaded good previous shims
- went through manual locking procedure to adjust z0 and phase
- verified that lock is not saturated - adjust power and phase (see Locking)
I recommend performing shimming in a dedicated workspace: #3
- Join experiment 3: Enter 3 in Viewport:Workspace:Current Workspace field
- Issue gmapsys
This command sets up a gradient shimming experiment. If you already did gradient shimming in this workspace before, this command is not necessary.
- In the Parameter Panel, navigate to Acquire:Gradient Shim
- Make sure you have
- checked Shim z1-z4 first
- Have 5 in # Shims Used
- Verify you have the most recent shimmap shown in the Current mapname window
- Record in your notebook the current lock value
- NOTE: Spinning on this machine is not stable and not recommended. If you still want to use spinning:
- Choose Sync with spinner in the drop-down list on the bottom of Parameter Panel
- turn it on in Start:Spin/Temp
- Click on Gradient Autoshim on Z
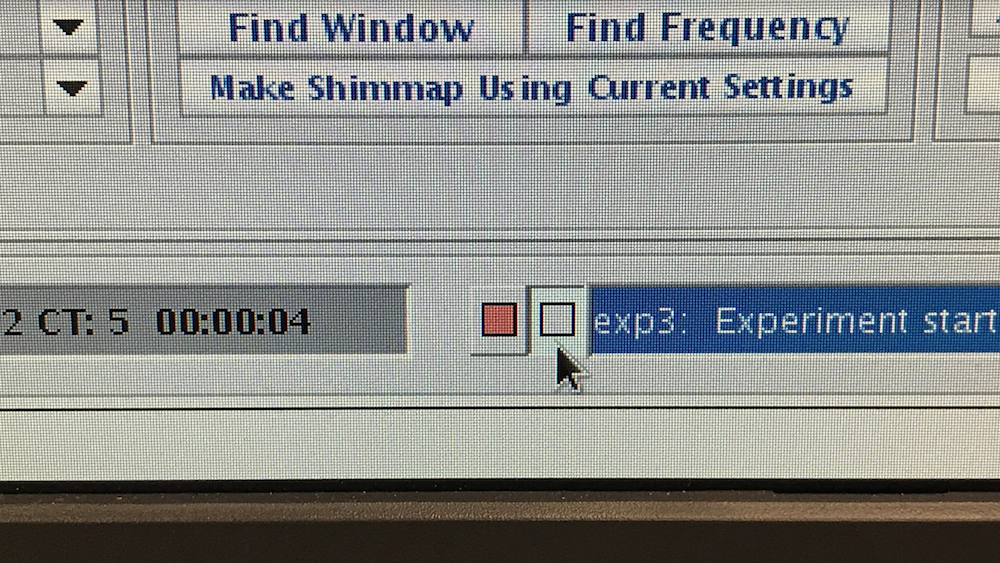
- Open the system messages window (click on the left of two square buttons at the bottom of the screen):
How to understand the Gradient Shimming output:
- Note Iteration #1 starts with relatively high rms err of 13.17 (Hz)
- At Iteration #2, rms err was reduced by adjustment of z1-z4 shims
- Addition of z5 to adjustment increases rms err (temporarily)
- By Iteration #4, the rms err was reduced to 0.48, which is a good low value.
Important steps to complete the shimming:
- Save the shim set to be able to start from it in the future:
- svs
- Enter the filename (usually 'current')
- Adjust lock:
- dial the value down to below 100 (range from 50 to 80 is good) by reducing Power in Start:Lock section
- Verify if lock is not saturated (it may become saturated if the shims improved a lot and you use neat deuterated solvent).
- If you adjusted the lock down, you may want to run Gradient Shimming one more time to further improve shimming.
Making a new experiment in the workspace
- Just enter a new number in Viewport:Workspace:Current Workspace field
- issue explib to view the current workspaces that are available
- NOTE: it will not work out of the workspace where you do tuning
- NOTE 2: sometimes - issuing explib twice is necessary to refresh the screen
Proton and carbon 1D
Workflow for initial set up:
How to run an experiment with the same parameters as before
2D experiments and other exciting stuff
To setup any complicated experiment :
- Run appropriate 1D from Experiments:Proton
- Convert parameters to the desired experiment using Experiments selection in a section Convert Current Parameters To Do
- IMPORTANT NOTE: All 2D experiments require accurate 90-degree pulse value. Some samples will work with the default values but some will not. For best sensitivity - determine 90 degree pulse time for proton and X-nucleus
- Adjust number of scans, spectral widths and center frequencies
- Adjust gain by Find Gain
- Run (hit Go)
- To process incomplete experiment: unclick checkbox F1 linear pred in Process:Basic:Process Options
- Save data after it is finished Saving my data
- Do processing and analysis in TopSpin Importing NMR data to Topspin
More on 2D and other experiments
Saving my dataEvery experiment performed in the workspace must be explicitly saved to a vnmrsys/data. This is where the NMR server pulls your data from.
- Select File:Save As
- Make a folder for current experiment set and enter it
- Add your file name to the path shown in File Name
- Click Save
NOTE: At a later time, you may open any of saved files into any workspace to look at the data or run a new experiment. This will replace data in the workspace but the source file in the vnmrsys/data will not be affected.
Finishing my work
Remember to save your data from every workspace where you did acqusition! See Saving my data
Insert a standard sample in the magnet
- Unlock the instrument:
- Click on Start tab, Lock section
- Uncheck Lock checkbox
- Turn off spinning
- Click on Spin/Temp section
- Click Spin off
- Click Eject button
- Replace your sample with a standard CDCl3 sample at the top of the bore
- Click Insert button
- Lock on the standard see Locking
- Exit VNMRJ
- Log out and answer all questions accurately.
You are done with the Varian 600.
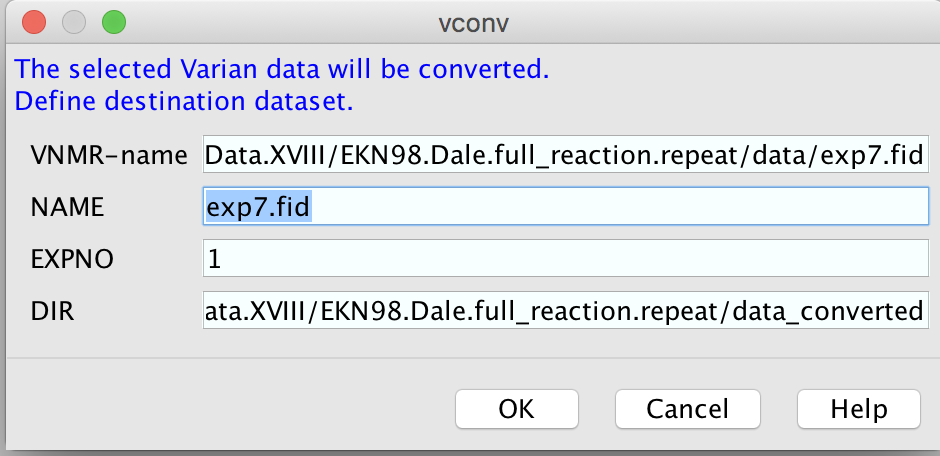
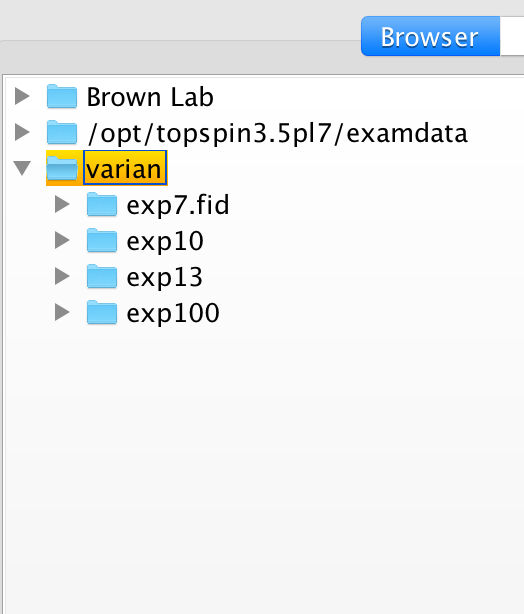
Importing and processing NMR data to Topspin
Importing data
Processing a 2D Varian data in Topspin
For experiments performed with States-TPPI frequency discrimination mode (most common experiments):
- Set ACQUPARS:Experiment section: FnMode = States
- Set PROCPARS:Fourier Transform section, MC2 = States
- Click Process
If the 2D experiment was performed with Rance-Kay (Echo-Antiecho) mode, then you should choose this mode for both settings above.
Using variable temperature
IMPORTANT NOTE 1: Only change temperature in steps of 10 degrees followed by 3 minutes wait time after every step.
IMPORTANT NOTE 2: Only change samples while you are within -80 to +80 Deg C. When above or below these limits: change temperature first to shift probe to the inside the limits then - change the sample.
Here is why: the probe contains expensive glass insert which is a double-walled evacuated insulator. Step-wise increase in temperature allows thermal stress to dissipate safely for the glass. Eject action passes a lot of room-temperature air through the probe - also stresses glass.
- Using the temperature HIGHER than a room temperature
- Using the temperature LOWER than a room temperature with Air-Jet FTSSystems chiller
Using the temperature HIGHER than a room temperature
- Verify that the Air-Jet is off and FTSSystems box is not running
- Use Start tab, Spin/Temp page to start regulating temperature at 10 degrees above room temperature. Wait 3 min.
- Increase the temperature in 10-degree steps. Wait 3 min after each step.
- After you reached the final temperature, wait full 10-15 minutes (for equilibration of your sample and NMR system)
- It is necessary to lock, tune and shim again before you start acquisition. You can eject and insert the sample while below 80 Deg C. When you are above this limit - you must lower the temperature first.
- After you finished acquiring data, you must bring probe temperature back to room temperature in the same slow manner: 10-degree steps with 3 minute wait time in between.
Back to Using variable temperature
Using the temperature LOWER than a room temperature with Air-Jet FTSSystems chiller
- Use Start tab, Spin/Temp page to start regulating temperature at 20 degrees C.
- Check whether the Air-Jet and FTSSystems box are running. If not - turn on the Air-Jet (chiller) by using the green button.
- Set temperature on the VT gas supply 10 degrees lower than the desired temperature in the probe (use arrows on the FTSSystems control panel).
The lowest temperature you can set is -80C. The actual lowest temperature in the probe will be, probably, -60 to -40 C.
- Push Run button to start temperature control for the VT gas. It will take some 10-15 minutes for the gas supply to become sufficiently cold.
- Use Start tab, Spin/Temp page in VNMRJ to reduce the temperature in 10-degree steps. Wait 3 min after each step.
- After you reached the final temperature, wait full 10-15 minutes (for equilibration of your sample and NMR system)
- It is necessary to lock, tune and shim again before you start acquisition. You can eject and insert the sample while above -80 Deg C.
- After you finished acquiring data, you must bring probe temperature back to room temperature in the same slow manner: 10-degree steps with 3 minute wait time in between.
- Once your are back to room temperature:
- Set temperature in Start tab Spin/Temp page to 24 degrees.
- Turn off Air-Jet
- Push Run button on FTSSystems box to stop it (Run light should go out).
Restarting VT/Gas controlGo to Start tab, Spin/Temp page;
Reset air supply
Reset temperature controller
Restarting spectrometer (only by authorized users!)
This is a procedure for complete reboot of the VNMRS system if you see some "weird" behavior. There are two versions of the sequence: Light and Full Reboot.
Light Reboot
Use as the first remedy. This procedure re-initiates communication between PC and the VNMRS system. Takes about 2-3 min.
- Save shims first in VnmrJ
- type svs
- give an easy-to-remember file name: current
- type 'y' if file exists
- Exit VnmrJ
- Stop communication with the console
- Open a terminal window (right-click on the screen desktop background, choose "Open Terminal")
- Type in su acqproc
- Wait till you see the command line prompt again
- type su acqproc again to start communication of the desktop computer with the console
- Start VnmrJ
- you should see green status bar with "Idle" in it.
- If you see a yellow bar with "Inactive" - stop and report a problem to NMR Center staff!
- Load shims
- type rts
- type the file name: current
- type su
You may proceed with locking/tuning/shimming, etc.
Full Reboot
Use this procedure if the Light Reboot sequence did not help.
- Save shims first in VnmrJ
- type svs
- give an easy-to-remember file name: current
- type 'y' if file exists
- Exit VnmrJ
- Stop communication with the console
- Open a terminal window (right-click on the screen desktop background, choose "Open Terminal")
- Type in su acqproc
- Wait till you see the command line prompt again
- Log out of your account (this step may be skipped if no abnormalities to computer operation is observed)
At this point you may also reboot the PC. It will create a completely clean state of the system.
- Log in
- Restart VNMRS system
- Push the reset button on the right-most board (labeled MASTER)
- Wait till the console restarts - the lights begin flashing again
- you will hear a hiss at the pneumatic router and see flashing LEDS - normal!
- Start communication of the desktop computer with the console
- open the terminal window
- type su acqproc
- wait till the operation finished (you see new UNIX prompt)
- Start VnmrJ
- you should see green status bar with "Idle" in it.
- If you see a yellow bar with "Inactive" - stop and report a problem to NMR Center staff!
- Load shims
- type rts
- type the file name: current
- type su
- Reset air supply
- Click Start : Spin/Temp
- Setting for the VT Air Flow should be 10 L/min
- click Reset Pneumatic Router
- you should see the lights on the router stop flashing
- Air flow on the router gauge should be 10-12 L/min
- Reset temperature controller
- Click Start : Spin/Temp
- click Reset VT Controller
- watch the screen of the VT display show PASS and return to temperature value
- Message bar shows "This operation takes a moment"
- wait for it to switch to "Set hardware operation complete"
- Start temperature control
- Enter desired value
- click Regulate Temp
- you should hear a knocking sound of the pressure valves switching
- NOTE: If you need a temperature below 20C you need to be trained to use FTS temperature control system!
- Turn on spinner (if needed)
NOTE: Spinning on this machine is not stable and not recommended.
- Set spin speed to 20 Hz
- click Regulate Speed
- wait 5 min to allow for all values to equilibrate
- you may proceed with locking/tuning/shimming, etc.
Back to Top
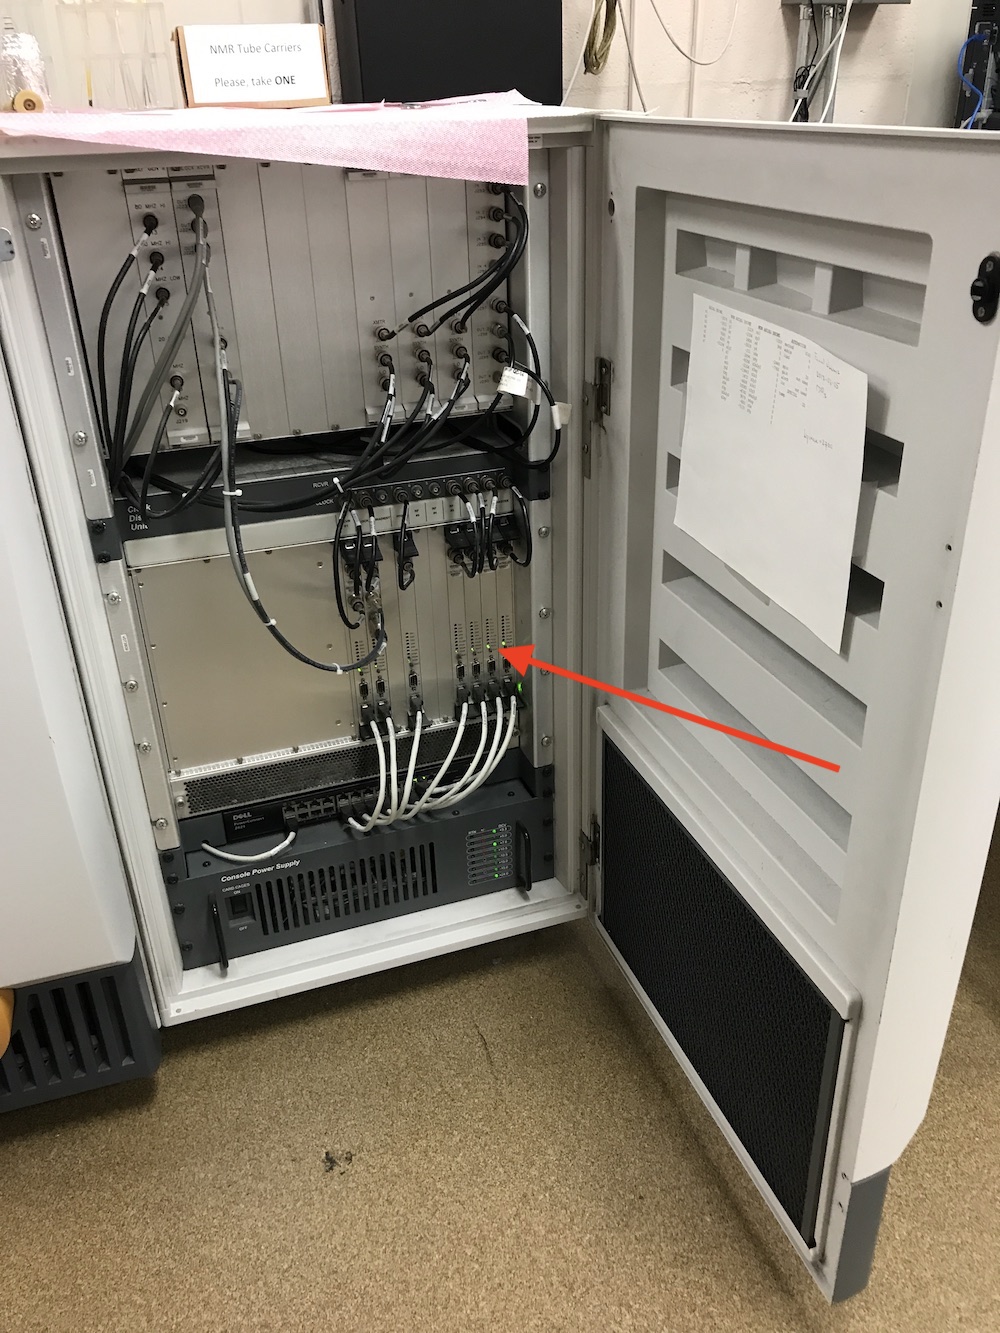
Turning on the spectrometer after a power outageIf there was a power outage and the UPS did not hold for long enough, the spectrometer console shuts down and does NOT automatically restart after the power has been restored. You will find spectrometer console silent and VNMRJ will be showing "Inactive" in its status bar. If you open the right door of the console cabinet you will see no lights:
You will need to turn on spectrometer console, reconnect with VNMRJ and reset the VT gas supply. To do this:
- Exit VNMRJ
- Approach the back spectrometer console:
- Find "Main Power" switch and flip it down (if it was up) then flip it up. After that, push the green button to start the console.
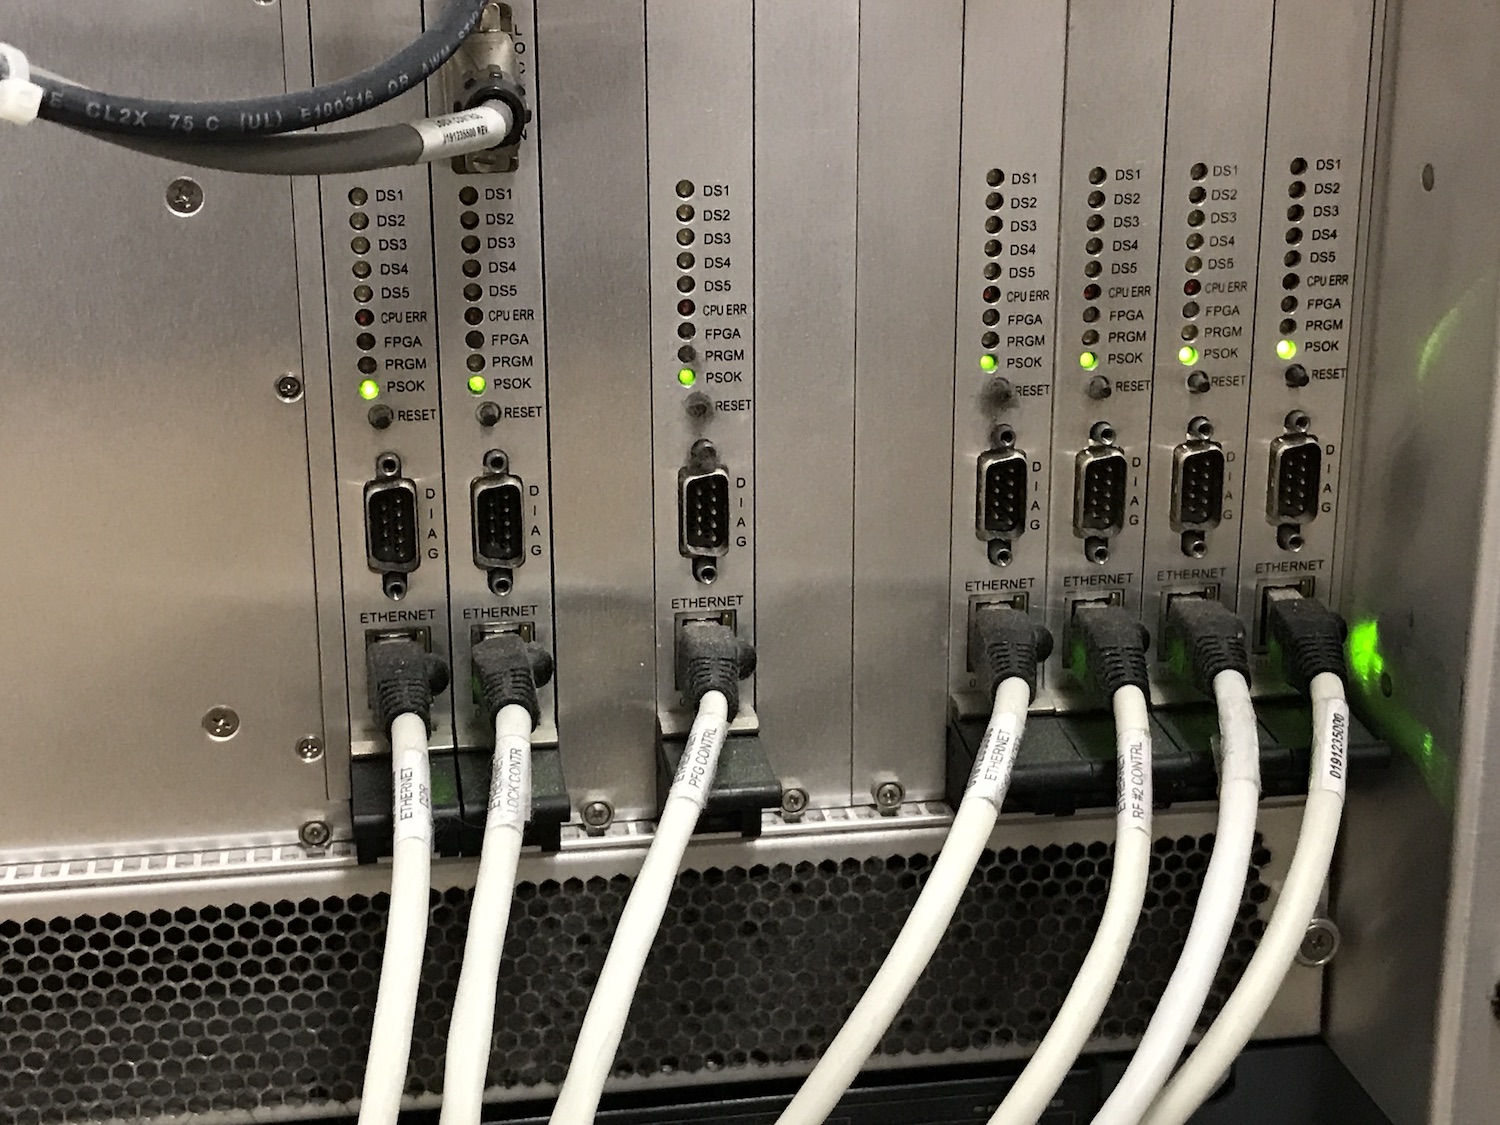
- Check the startup of the console: open right door and look at the lights of the digital boards. Immediately after restart you may see only a few lights:
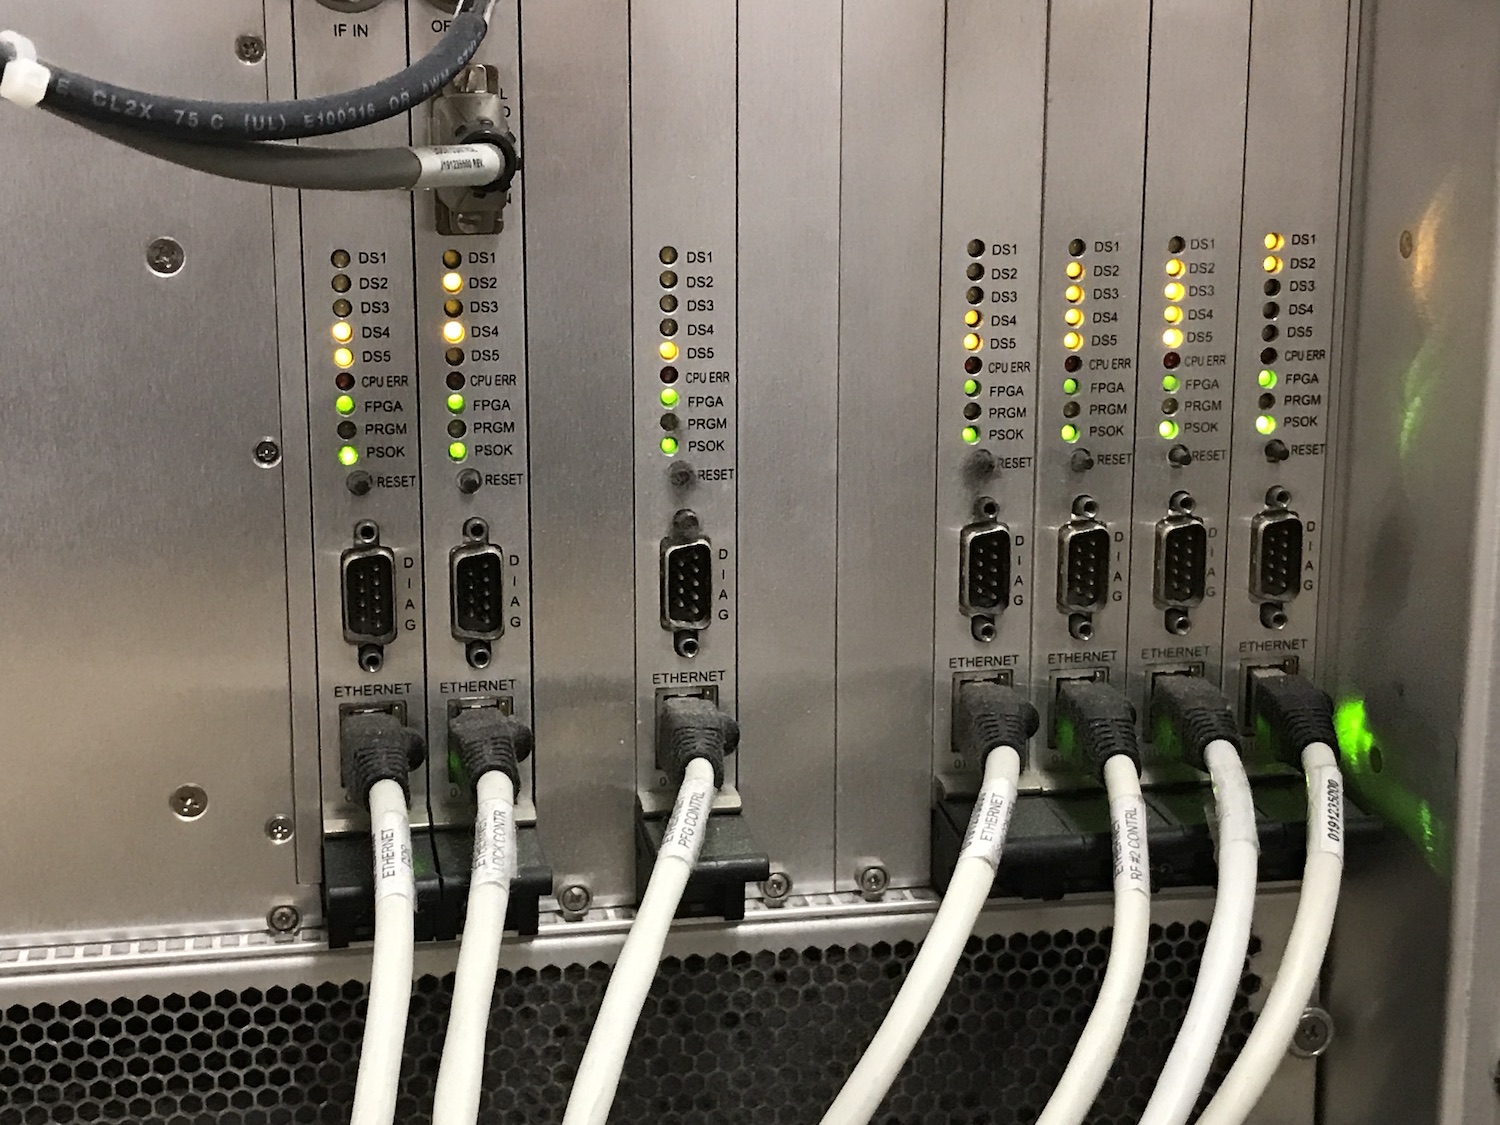
which will change into a "dynamic display" of blinking lights running up and down -- similar on all boards:
A this point, the console has been fully started.
- Close the console door
- Launch Topspin
- Follow this link to restart VT gas control: Restarting VT/Gas control
Restoring cable contact for carbon tuning
This procedure is due when the X-nucleus tuning curve in trtune('remotely') does not have a symmetrical shape like this (green):
When the console cable connection goes bad, the green curve would look very significantly lopsided or distorted. This leads to poor sensitivity on X channel.
Protocol to remedy the issue:
- Have the tuning experiment running and carbon and proton curves displayed
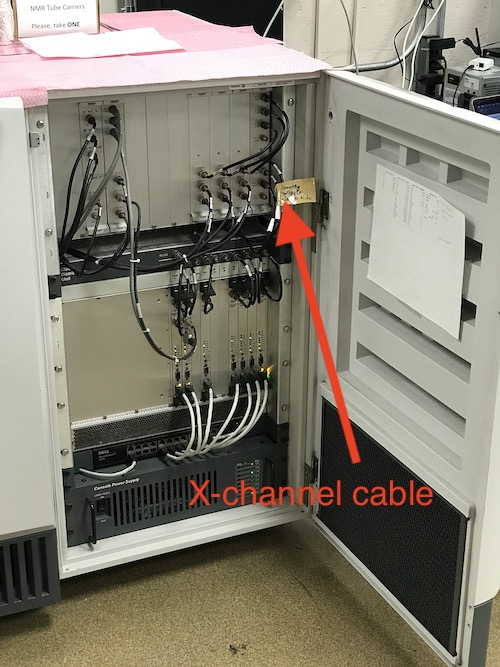
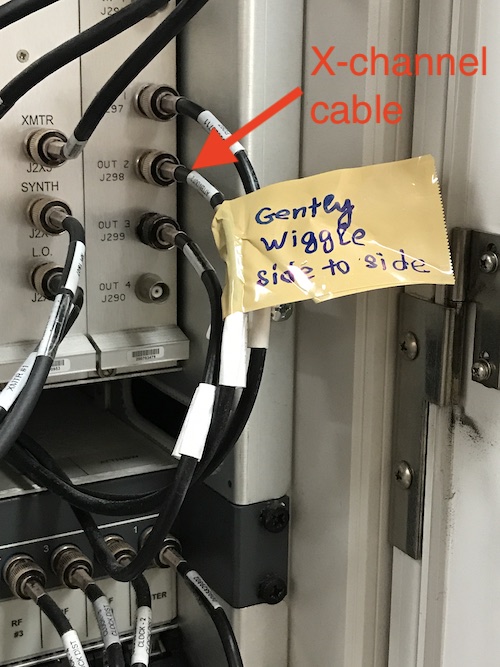
- Open the right console door:
- locate the X-channel cable
- gently move it sideways while looking at X-channel tuning curve - must shift to a symmetrical shape:
 |