
|
Updated 10/16/2024
The instrument is equipped with two conventional probes: a triple resonance inverse probe, TXI, and a broadband probe for direct detection of X nucleus, BBO. The TXI probe is used for all proton-detected experiments such as HSQC, HMBC, NOESY, ROESY, COSY, and others. The BBO is used for carbon 1D experiments.
Required workflow:
Determine what probe is installed
The best practice is to contact us ahead of the time to make sure the spectrometer has the right probe for you.
- Type edhead on a Topspin command line. The dialog window appears:
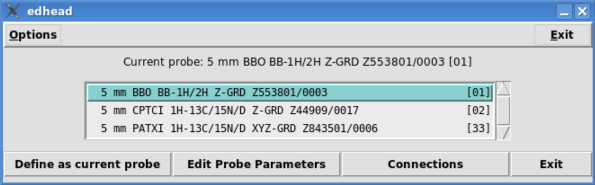
- The "Current probe:" message and a highlighted line in a table indicates the installed probe:
5 mm BBO... - is a BBO probe for carbon detection
5 mm CPTCI... - is a cryogenic probe for proton and carbon detection. NOTE: currently not functional.
5 mm PATXI ... - is a TXI probe for proton detection
- To quit this dialog
- click Exit
- a window with spectrometer wiring appears: click Close
If you see that the probe is a wrong type for your experiments, please, contact NMR staff to change the probe.
Set the probe temperature
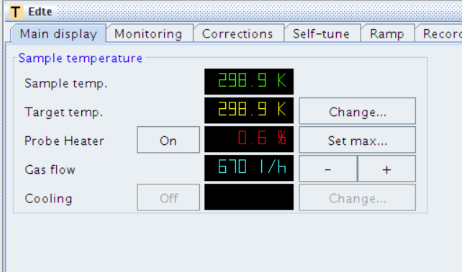
| "Target temp." setting | Actual temperature in a sample |
|---|---|
| 299.6 | 298.0 K (24.8 C) |
| 295.2 | 293.4 K (20.2 C) |
| 291.2 | 289.2 K (16.0 C) |
| "Target temp." setting | Required Gas flow | Actual temperature in a sample |
|---|---|---|
| 300.0 | 400 | 298.2 K (25.0 C) |
| 299.6 | 400 | 298.0 K (24.8 C) |
| 295.2 | 400 | 293.4 K (20.2 C) |
| 291.2 | 400 | 289.2 K (16.0 C) |
| 282.0 | 670 | 278.7 K (5.5 C) |
Insert your sample
Before operating the SampleCase - please, review these guidelines: SampleCase training
- Turn off lock and rotation:
- ro off
- lock off
For regular NMR tubes shorter than 9 inches: use SampleCase
For Shigemi NMR tubes
- Check that your Shigemi tube has 8 mm bottom piece ("Bruker" tube)
- Set the tube in a spinner to have the sample volume is centered around horizontal line in the middle of the coils
NOTE: The bottom of the Shigemi tube does NOT touch the bottom of the depth gauge !
- Use SampleCase
For J. Young tubes and other tubes longer than 9 inches: bypass SampleCase
Follow the Manual Insertion guidelines with these modifications:
- find the blue gas valve on top of the magnet near the bore (opposite side to the rail)
- If the current probe is TXI:
- increase gas flow to 670 LPH for eject and insertion
- reduce gas flow to 400 LPH after you inserted
- Do NOT turn off VTU after you finished working with the SampleCase
Tune
- Display the experiment that has nuclei that you intend to use: check Procpars:Nucleus section.
- Type
spooler
qu atma
qu wobb
Watch spooler window for atma to finish and exit and wobb start.
- Double-check the tuning results in wobb window.
NOTE: wobb will never finish on its own. You must click stop button in the toolbar.
Load shims
- Load an appropriate shim set:
- Type rsh
- Select
- for normal tubes: BBO or TXI
- for Shigemi tubes with the TXI probe: TXI_shigemi
- Click Read
Lock and Shim
Create a new experiment
NOTE: If your experiment uses a non-Bruker pulse program, which someone wrote, you must contact NMR staff to set it up properly for the current probe!
Finish your work
Before leaving, you should insert the standard sample and lock:
- spooler
- qu lock off
- qu ro off
- qu sx 1
- qu rsh TXI (or BBO - as appropriate for the current probe)
- qu lock cdcl3
You must watch the Spooler window for all commands to finish and the lock established before you exit Topspin!
 |
